-->

分類

2017年3月22日 星期三

Unity depth mask using additional camera

reference
sample unity package
Note: this trick doesn't work with Unity SteamVR plugin's CameraRig
Note: this is a different implementation from the depth mask from unity wiki

The basic idea of depth mask is just like normal z-test. You use transparent objects (say mask objects) that are closer to the camera so other objects behind the mask objects will not pass the z-test and not be rendered.

However the problem is that under the same camera rendering, transparent objects can't be considered as passed z-test when opaque objects are behind them.

So the trick is just like the reference link above, use another camera (say camera2) that draws masked object after previous camera(say camera1) rendered the transparent masks.

In this case, camera1 draws first and makes transparent objects write to the z-buffer, then when camera2 is drawing, since the z-buffer is occupied by the transparent objects, the object behind the mask will fail the z-test.

Apparently, the camera1 and camera2 need some settings to achieve the mask effect. Just like the reference link, camera1 needs to render before camera2, so the "depth" property in Unity camera needs to be setup. Just set camera2's depth be larger than camera1's depth to achieve the rendering order.

Then since camera2 draws on top of camera1, camera2's "clear flags" needs to be set as "Don't clear".

Make sure that camera2 has exactly the same camera properties and 3D objects settings as camera1(transforms, fov...), otherwise the rendered scenes will not match.

Add transparent objects into the scene as mask. The transparent objects need to write into the z-buffer, you can use the shader code below to achieve this.

Finally, add a User Layer in Unity (say MaskedObject as the layer name), set masked object to be in the MaskedObject layer, set camera2's culling mask to MaskedObject, then try to move the masked object behind the transparent masks.


here is the result
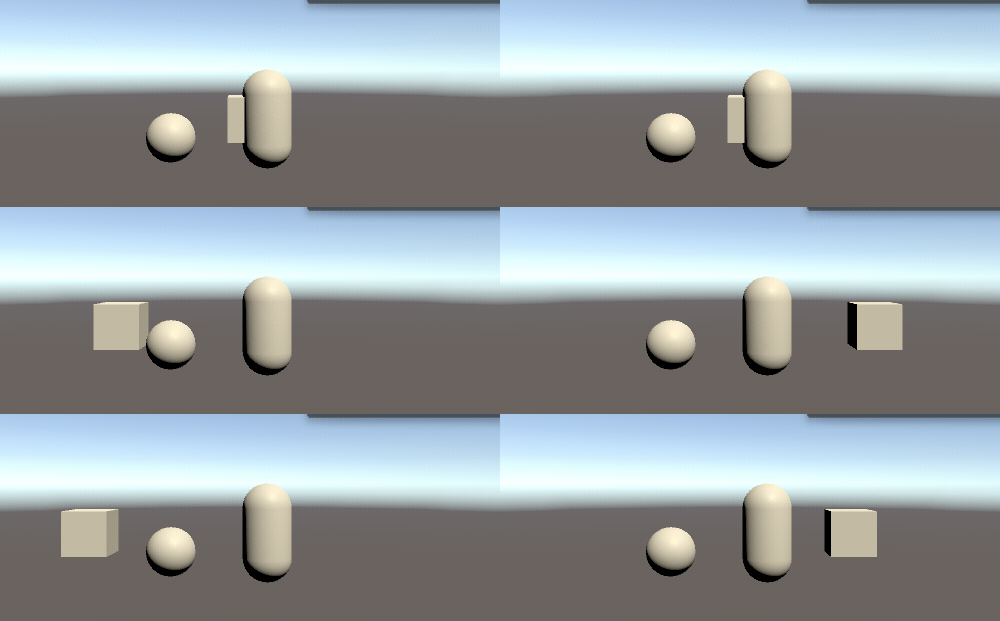
the moving cube is masked at certain positions, those positions actually are occupied by transparent cubes and the transparent cubes occlude the masked cube.

the shader code for transparent mask object
Shader "SimpleTransparentZWrite"
{
 SubShader
 {
  Tags{ "Queue" = "Transparent" }
  Pass{
   Blend SrcAlpha OneMinusSrcAlpha
   ZTest LEqual
   Cull Back

   ZWrite On
   CGPROGRAM
   #pragma vertex vert
   #pragma fragment frag
   #include "UnityCG.cginc"
   struct appdata {
    float4 vertex : POSITION;
   };
   struct v2f {
    float4 pos : SV_POSITION;
   };
   v2f vert(appdata v) {
    v2f o;
    o.pos = UnityObjectToClipPos(v.vertex);
    return o;
   }
   half4 frag(v2f i) : SV_Target{
    return half4(0,0,0,0.0);
   }
   ENDCG
  }
 }
}

2017年3月8日 星期三

Windows Node JS app deployed on heroku(using GitHub)

03/14/2017 update: add new heroku deploy notes about modifying the app entry point. if the entry point is not modified, the heroku server always runs the heroku NodeJS sample

1. Download NodeJS here: https://nodejs.org/en/download/ , install NodeJS

2.  Go to GitHub and create a repository: https://github.com/

my repository name is TestNodeJS


3. Go to heroku and create an app: https://dashboard.heroku.com/apps

my heroku app name is myynodejstest

4. Setup heroku's NodeJS sample (follow the steps in the link): https://devcenter.heroku.com/articles/getting-started-with-nodejs#introduction

clone heroku NodeJS sample:
https://devcenter.heroku.com/articles/getting-started-with-nodejs#prepare-the-app

5. git push the heroku NodeJS sample to the GitHub repository created in step 2

6. link GitHub repository to heroku app and deploy to heroku

go to your heroku app dashboard: https://dashboard.heroku.com/apps/your_app_name
press the Deploy button


connect to the GitHub repository of your NodeJS project


deploy the GitHub repository branch


7. check your app by the link: https://your_heroku_app_name.herokuapp.com/

8. Windows NodeJS dev environment setup:
to make npm module globally accessible, you need to add npm module path to user's environment variable:
variable name: NODE_PATH
variable value: %USERPROFILE%\AppData\Roaming\npm\node_modules
for more info, please check here: http://stackoverflow.com/questions/9587665/nodejs-cannot-find-installed-module-on-windows

9. modify app entry point(03/14/2017 added)
not so sure but I changed the following fields
 -"app.json" - repository
 -"package.json" - main, scripts.start
 -"Procfile" - web: node {your_entry_point_file}(your server.js)

10 other things need to be noticed
 - npm package dependencies: need to modify "package.json" - dependencies
 - server's port: please use "port = process.env.PORT || 5000", if heroku can't bind the port

2017年2月12日 星期日

Notes about depth texture(using Unity shader code)

Depth texture used for effects like fog normally uses camera's depth texture, the shader code is as the following:

float depth01 = Linear01Depth(UNITY_SAMPLE_DEPTH(tex2D(_CameraDepthTexture, i.depthUV)));

Then you get the float in the range (0,1) for the depth value.

But the problem is that the depth texture of camera doesn't contains information about transparent objects, so we need to use fragment's depth in clip space, the shader code is as the following:

    struct appdata 
   {
          float4 vertex : POSITION;
  half2 texcoord : TEXCOORD0;
    };

    struct v2f 
    {
   float4 pos : SV_POSITION;
   float2 uv: TEXCOORD0;
        float2 depthUV : TEXCOORD1;
        float3 cameraToFarPlane : TEXCOORD2;
    float4 screenPos : TEXCOORD3;
    };
    
   v2f vert(appdata v) 
  {
    v2f o;
    o.pos = UnityObjectToClipPos(v.vertex);
o.screenPos = ComputeScreenPos(o.pos);
       ...
  }

  fixed4 frag (v2f i) : SV_Target 
 {
float depth01 = i.screenPos.w / (_ProjectionParams.z - _ProjectionParams.y);//normalize to the range(0,1)
  //i.screenPos.w: depth(z) in camera space, range(n, f), i think(could be wrong). Please check http://blog.csdn.net/zhao_92221/article/details/46844267 and http://www.songho.ca/opengl/gl_projectionmatrix.html for details. I guess unity uses projection matrix to map (n,f) to (0,1), could be wrong
  //_ProjectionParams.z - _ProjectionParams.y: camera far - near
  }

One use case of these two different values is that you can use it to measure the thickness of the transparent objects(e.g. the depth of water object). Simply use the depth for fragment in clip space to subtract the depth in camera's depth texture.

2017年1月23日 星期一

fixed Unity standard asset water reflection in VR environmemt(SteamVR only)

[DOWNLOAD the unity package] (note: need to import Unity SteamVR plugin first, tested with SteamVR plugin 1.1.1 and SteamVR plugin 1.2. Unity may show compilation error if the SteamVR plugin is not compatible with the script for the water, you can fix the script by following the instructions at the line where compilation error occurs)
The water module  from Unity standard asset has problem with reflection under VR environment.
This link has the solution to reflection under VR environment in Unity.
https://forum.unity3d.com/threads/5-4-beta15-reflection-rendering-wrong-in-openvr-htc-vive.398756/

Simply apply this solution to the water module's source code then the problem is solved.

02/10/2017 update(package is also updated for the download link):
Fixed the missing prefab problem from previous unity package. Added instructions to fix SteamVR plugin incompatible problem.

02/03/2017 update(package is also updated for the download link):
some modifications for single pass stereo rendering, removed the discontinuous texture sampling artifacts when single pass stereo rendering turned on.

Some notes:
The reflection use a camera for reflection. The reflection camera is at the reflection pose of the main camera by the reflection surface.

The reflection camera makes a render texture for the reflection surface plane.

The reflection camera modified it's projection matrix so that its clip plane will be the reflection plane(so that object between reflection camera and the reflection surface will not be rendered). It transforms it's view frustum to be oblique view frustum.
Oblique view frustum derivation
view frustum culling(the relationship between view frustum plane and projection matrix)
reflection matrix
oblique view frustum transform implemented by C#

The reflection camera has different pose for left eye and right eye in VR enivronment:
Vector3 eyePos = cam.transform.TransformPoint(SteamVR.instance.eyes[0].pos);
Quaternion eyeRot = cam.transform.rotation * SteamVR.instance.eyes[0].rot;
Matrix4x4 projectionMatrix = GetSteamVRProjectionMatrix(cam, Valve.VR.EVREye.Eye_Left);

 Vector3 eyePos = cam.transform.TransformPoint(SteamVR.instance.eyes[1].pos);
 Quaternion eyeRot = cam.transform.rotation * SteamVR.instance.eyes[1].rot;
 Matrix4x4 projectionMatrix = GetSteamVRProjectionMatrix(cam, Valve.VR.EVREye.Eye_Right);

The reflection camera has different render textures for left and right eye:
render the render texture for left and right eye on the same texture by specifying the range where the texture of each eye should be drawn:
    private static readonly Rect LeftEyeRect = new Rect(0.0f, 0.0f, 0.5f, 1.0f);
    private static readonly Rect RightEyeRect = new Rect(0.5f, 0.0f, 0.5f, 1.0f);
    ...
    m_ReflectionCamera.rect = camViewport;//camViewport is LeftEyeRect or RightEyeRect
So the reflection render texture's left half part is for left eye, right half part is for right eye.
And when sampling the reflection render texture, the uv coordinates need to be modified according to which eye is being used:
vert shader
o.screenPos = ComputeScreenPos(o.pos);
frag shader
half4 screenWithOffset = i.screenPos;
#ifndef UNITY_SINGLE_PASS_STEREO
if (unity_CameraProjection[0][2] < 0)
{
screenWithOffset.x = (screenWithOffset.x * 0.5f);//make x as 0 ~ 0.5
}
else if (unity_CameraProjection[0][2] > 0)
{
screenWithOffset.x = (screenWithOffset.x * 0.5f) + (screenWithOffset.w * 0.5f);//0.5~1
}
#endif

for Single Pass Stereo Rendering case, the "screenWithOffset" will be handled automatically since single pass stereo rendering treats the texture as a combined texture for left and right eye. It will use left half texture for left eye, right half texture for right eye, we don't need to modify the screenWithOffset.x as the case of non single pass stereo rendering

2016年9月7日 星期三

Unity 2d wave-like motion mesh

reference

this needs one script attached to an empty GameObject and one material with texture

result video


public class WaveMesh : MonoBehaviour {
    private Mesh m_Mesh;
    private float size = 0.5f;
    private int gridSize = 8;
    public float waveFrequency = 5.0f;
    public float sizeScale = 0.5f;
    // Use this for initialization
    void Start () {
 
 }
 
 // Update is called once per frame
 void Update () {
        int dotsPerRow = gridSize + 1;
        int halfGridSize = gridSize / 2;
        Vector3[] verts = m_Mesh.vertices;
        float time = Time.time;
        for (int i = 0; i < dotsPerRow; i++)
        {
            for (int j = 0; j < dotsPerRow; j++)
            {
                int xIndex = j - halfGridSize;
                int yIndex = halfGridSize - i;
                float xSign = Mathf.Sign(xIndex);
                float ySign = Mathf.Sign(yIndex);
                float xPosTarget = xIndex;
                float yPosTarget = yIndex;
                //if (xIndex != 0 && yIndex != 0)
                {
                    Vector2 wave = waveCoord(xIndex, yIndex, halfGridSize, time);
                    verts[i * dotsPerRow + j] = new Vector3(wave.x, wave.y, 0.0f);
                }           
            }
        }
        m_Mesh.vertices = verts;
    }

    private Vector2 waveCoord(float xIndex, float yIndex, float halfGridSize, float time)
    {
        Vector2 p = new Vector2(xIndex, yIndex);
        
        p = p * sizeScale;
        float len = p.magnitude;
        float sincValue = sinc(p.magnitude * 0.5f);
        float temp = Mathf.Cos(time * waveFrequency - len / sizeScale) * 0.5f * sizeScale * sincValue;
        Vector2 offset = new Vector2(Mathf.Sign(xIndex) * temp, Mathf.Sign(yIndex) * temp);
        return offset + p;
    }

    private float clampTimeToPeriod(float time, float period)
    {
        return time - Mathf.Floor(time / period);
    }

    private float sinc(float x)
    {
        if(Mathf.Abs(x) < 0.0001f)
        {
            return Mathf.Sin(x);
        }
        return Mathf.Sin(x) / x;
    }

    void Awake()
    {
        GameObject plane = new GameObject("CreatedWaveMesh");
        MeshFilter meshFilter = (MeshFilter)plane.AddComponent(typeof(MeshFilter));
        meshFilter.mesh = CreateMesh();
        m_Mesh = meshFilter.mesh;
        MeshRenderer renderer = plane.AddComponent(typeof(MeshRenderer)) as MeshRenderer;
        //Load your material here
        Material newMat = Resources.Load("Materials/WaveStandardMaterial", typeof(Material)) as Material;
        renderer.material = newMat;
        //plane.transform.localScale = new Vector3(desiredSize / gridSize, desiredSize / gridSize, -1);
        plane.transform.localScale = new Vector3(1, 1, -1);
        plane.transform.localPosition = new Vector3(0.64f, 0.38f, -3);
    }

    Mesh CreateMesh()
    {
        Mesh m = new Mesh();
        m.name = "ScriptedMesh";
        /*
        case for gridSize == 4, there are 4x4=16 grids, dotsPerRow is 4+1=5
        .....
        .....
        .....
        .....
        .....
        */
        int dotsPerRow = gridSize + 1;
        int halfGridSize = gridSize / 2;
        Vector3[] verts = new Vector3[dotsPerRow * dotsPerRow];
        for (int i = 0; i < dotsPerRow; i++)
        {
            for(int j = 0; j < dotsPerRow; j++)
            {
                verts[i * dotsPerRow + j] = new Vector3(j - halfGridSize, halfGridSize - i, 0.0f);
            }
        }
        m.vertices = verts;

        Vector2[] uvs = new Vector2[verts.Length];
        float dotsPerRowf = (float)dotsPerRow;
        for (int i = 0; i < dotsPerRow; i++)
        {
            for (int j = 0; j < dotsPerRow; j++)
            {
                uvs[i * dotsPerRow + j] = new Vector2((float)j / dotsPerRowf, 1.0f - (float)i / dotsPerRowf);
            }
        }
        m.uv = uvs;

        int numTris = gridSize * gridSize * 2;
        int[] tris = new int[numTris * 3];
        
        for(int i = 0; i < gridSize; i++)
        {
            for(int j = 0; j < gridSize; j++)
            {
                int startIndex = 6 * (i * gridSize + j);
                tris[startIndex] = i * dotsPerRow + j;
                tris[startIndex + 1] = (i + 1) * dotsPerRow + j;
                tris[startIndex + 2] = i * dotsPerRow + j + 1;
                tris[startIndex + 3] = (i + 1) * dotsPerRow + j;
                tris[startIndex + 4] = (i + 1) * dotsPerRow + j + 1;
                tris[startIndex + 5] = i * dotsPerRow + j + 1;
            }
        }
        m.triangles = tris;
        m.RecalculateNormals();

        return m;
    }
}

2016年8月25日 星期四

Android Local unit test/Instrumentation Test

reference 1
reference for unit test

basic:

differences between Local unit test and Instrumentation Test:
Local unit test: can just run on JVM, doesn't need Android framework
Instrumentation Test: can test Android component(Activity, Service...) and UI

create Class for testing(both local unit test and instrumentation test) in app/src/androidTest/java/<package_name>

set build.gradle:
dependencies {
    androidTestCompile 'junit:junit:4.12'
    androidTestCompile 'com.android.support.test:runner:0.4'
    // Set this dependency to use JUnit 4 rules
    androidTestCompile 'com.android.support.test:rules:0.4'
    androidTestCompile 'com.android.support:support-annotations:23.1.1'
}

mokito for mocking context seems useless if we use the sample code snippet here (the Context is null and MockitoAnnotations.initMocks can't work

sample Local unit test

import org.junit.Test;
import static org.junit.Assert.assertFalse;
import static org.junit.Assert.assertThat;
import static org.junit.Assert.assertTrue;
public class MyUnitTest {
    @Test
    public void testOne() {

        assertTrue("123".equals("123"));
    }
}


sample Instrumentation test
import android.test.ActivityInstrumentationTestCase2;
import android.test.UiThreadTest;
import android.widget.Toast;

//JUnit4
public class ActivityFunctionTest extends ActivityInstrumentationTestCase2 {
    public ActivityFunctionTest(Class activityClass) {
        super(activityClass);
    }

    public ActivityFunctionTest(){
        super(MainMenuAcitivity.class);
    }

    public void testSetText() throws Exception {

        // set text
        getActivity().runOnUiThread(new Runnable() {

            @Override
            public void run() {
                MainMenuAcitivity activity = getActivity();
                Toast.makeText(activity, "test toast 2", Toast.LENGTH_SHORT).show();
            }
        });

        getInstrumentation().waitForIdleSync();

    }

    @UiThreadTest
    public void testSetTextWithAnnotation() throws Exception {

        MainMenuAcitivity activity = getActivity();
        Toast.makeText(activity, "test toast", Toast.LENGTH_SHORT).show();

    }
}

monkey command:
adb shell monkey -p <package_name> -v <number_of_events>