split binary profiler data (in order to view more frames in profiler):
http://www.itdadao.com/articles/c19a766424p0.html
calculate FPS:
https://github.com/MattRix/UnityDecompiled/blob/master/UnityEditor/UnityEditor/GameViewGUI.cs
http://www.jianshu.com/p/1c22321d88af
https://gamedev.stackexchange.com/questions/118934/unity-stats-framerate-vs-time-deltatime
note about FPS calculation:
1. UnityStats.frameTime, UnityStats.renderTime seem can only be read in OnGUI()
2. the FPS in Profiler(and Unity stats window) seems to match the value (1.0f / (UnityStats.frameTime + UnityStats.renderTime)), not sure but currently my experimental results match the calculation
package download link:
https://drive.google.com/file/d/1weD2QOAh7wyUWINor8Na0Ix-d__15vlv/view?usp=sharing
2017年7月11日 星期二

2017年6月8日 星期四
[Note] convert transform matrix from right-handed coordinate system to left-handed coordinate system
Rotation:
angle: rotate negated angle
axis: negate z component
https://butterflyofdream.wordpress.com/2016/07/05/converting-rotation-matrices-of-left-handed-coordinate-system/
https://www.evl.uic.edu/ralph/508S98/coordinates.html
Translation:
negate z component
Then you have things like SteamVR pose to Unity pose conversion in SteamVR_Utils in Unity's SteamVR plugin:
public RigidTransform(HmdMatrix34_t pose)
{
var m = Matrix4x4.identity;
m[0, 0] = pose.m0;
m[0, 1] = pose.m1;
m[0, 2] = -pose.m2;
m[0, 3] = pose.m3;
m[1, 0] = pose.m4;
m[1, 1] = pose.m5;
m[1, 2] = -pose.m6;
m[1, 3] = pose.m7;
m[2, 0] = -pose.m8;
m[2, 1] = -pose.m9;
m[2, 2] = pose.m10;
m[2, 3] = -pose.m11;
this.pos = m.GetPosition();
this.rot = m.GetRotation();
}
angle: rotate negated angle
axis: negate z component
https://butterflyofdream.wordpress.com/2016/07/05/converting-rotation-matrices-of-left-handed-coordinate-system/
https://www.evl.uic.edu/ralph/508S98/coordinates.html
Translation:
negate z component
Then you have things like SteamVR pose to Unity pose conversion in SteamVR_Utils in Unity's SteamVR plugin:
public RigidTransform(HmdMatrix34_t pose)
{
var m = Matrix4x4.identity;
m[0, 0] = pose.m0;
m[0, 1] = pose.m1;
m[0, 2] = -pose.m2;
m[0, 3] = pose.m3;
m[1, 0] = pose.m4;
m[1, 1] = pose.m5;
m[1, 2] = -pose.m6;
m[1, 3] = pose.m7;
m[2, 0] = -pose.m8;
m[2, 1] = -pose.m9;
m[2, 2] = pose.m10;
m[2, 3] = -pose.m11;
this.pos = m.GetPosition();
this.rot = m.GetRotation();
}
2017年5月23日 星期二
2017年4月23日 星期日
Unity UGUI text underline
reference

using UnityEngine;
using System.Collections;
using UnityEngine.UI;
public class TextUnderline : MonoBehaviour {
 //Text that draws underline
 public Text underline;

 /*
  refText: Text that its text content will be underlined
  clear: clear underline
  underlineVerticalOffsetScale: control distance between refText and underline

  sample hierarchy structure:

  refText(components: Text)
   underline(components: Text, TextUnderline)
 */
 public void setup(Text refText, bool clear = false, float underlineVerticalOffsetScale = 1.0f)
 {
  if(clear)
  {
   underline.text = "";
   return;
  }
  RectTransform rt = underline.GetComponent();
  RectTransform refRT = refText.GetComponent();

  underline.font = refText.font;
  underline.fontSize = refText.fontSize;
  //underline.fontStyle = refText.fontStyle;
  underline.color = refText.color;
  underline.text = "_";

  rt.localScale = refRT.localScale;
  float refHeight = refText.preferredHeight;

  float perlineWidth = underline.preferredWidth * rt.localScale.x;
  Debug.Log(perlineWidth);

  float refWidth = refText.preferredWidth;
  int lineCount = (int)Mathf.Round(refWidth / perlineWidth);
  Debug.Log(lineCount);
  for (int i = 1; i < lineCount; i++)
  {
   underline.text += "_";
  }

  float selfHeight = underline.preferredHeight;
  rt.anchoredPosition = new Vector2(0.0f, -(refHeight + selfHeight) * underlineVerticalOffsetScale);
 }
}
2017年4月4日 星期二
Unity load external script at runtime(using Visual Studio)
reference link
To load external script into Unity at runtime, the external script needs to be compiled as assembly(.dll), here are steps to do so.
1. Create a new C# project with Visual Studio, choose the project type as "Class Library"
2. Add UnityEngine.dll as project reference, the UnityEngine.dll is located at "<Unity_Install_Path>\Editor\Data\Managed". Add the dll to project reference by the following steps:
right click project name in Solution Explorer -> Properties -> Reference Paths -> Folder -> browse to find the folder that contains .dll -> Add Folder
right click "References" in Solution Explorer -> Add References -> Assembly -> search the dll you added
3. in the created Class Library project, create a class that extends MonoBehaviour like what we usually do in Unity, you can implement its Start(), Update()...
4. Release build this library project and remember the path to the .dll created by this library project
5. use the WWWAssemblyLoader in the reference link above or my modified assembly loader below:
6. load the dll and use reflection to control it as following:
7. the external script for above code can be:
To load external script into Unity at runtime, the external script needs to be compiled as assembly(.dll), here are steps to do so.
1. Create a new C# project with Visual Studio, choose the project type as "Class Library"
2. Add UnityEngine.dll as project reference, the UnityEngine.dll is located at "<Unity_Install_Path>\Editor\Data\Managed". Add the dll to project reference by the following steps:
right click project name in Solution Explorer -> Properties -> Reference Paths -> Folder -> browse to find the folder that contains .dll -> Add Folder
right click "References" in Solution Explorer -> Add References -> Assembly -> search the dll you added
3. in the created Class Library project, create a class that extends MonoBehaviour like what we usually do in Unity, you can implement its Start(), Update()...
4. Release build this library project and remember the path to the .dll created by this library project
5. use the WWWAssemblyLoader in the reference link above or my modified assembly loader below:
using UnityEngine;
using System.Collections;
using System;
using System.Reflection;

public class MyWWWAssemblyLoader
{

 public IEnumerator loadAssembly(string url, Action finishCallback)
 {
  if(url == null || finishCallback == null)
  {
   yield break;
  }
  WWW m_WWW = new WWW(url);
  while(!m_WWW.isDone)
  {
   yield return null;
  }

  Assembly assembly = LoadAssembly(m_WWW);
  if (assembly != null)
  {
   Debug.Log("load assembly: " + url + " Done");
   finishCallback(true, url, assembly);
  }
  else
  {
   Debug.Log("load assembly: " + url + " Failed");
   finishCallback(false, url, assembly);
  }

 }

 private Assembly LoadAssembly(WWW m_WWW)
 {
  try
  {
   return Assembly.Load(m_WWW.bytes);
  }
  catch (System.Exception e)
  {
   Debug.LogError(e.ToString());
   return null;
  }
 }
}
6. load the dll and use reflection to control it as following:
 IEnumerator Start()
 {
  //load script
  yield return StartCoroutine(loadAssemblyScriptAsync("file:///YourAssembly.dll", onAssemblyScriptLoaded));
 }

 private IEnumerator loadAssemblyScriptAsync(string url, Action callback)
 {
  MyWWWAssemblyLoader myLoader = new MyWWWAssemblyLoader();
  yield return StartCoroutine(myLoader.loadAssembly(url, callback));

 }

 private void onAssemblyScriptLoaded(bool success, string url, Assembly assembly)
 {
  if (!success)
  {
   Debug.LogError("onAssemblyScriptLoaded failed");
   return;
  }
  Debug.Log("Assembly url: " + url);

  System.Type type = assembly.GetType("YourClassNameSpace.YourClassName");
  if (type == null)
  {
   Debug.LogError("type is null");
   return;
  }
  FieldInfo field = type.GetField("YourFloatField");

  GameObject go = GameObject.Find("YourEmptyGameObject");
  //add loaded script to go
  Component comp = go.AddComponent(type);

  FieldInfo myFieldInfo = type.GetField("YourFloatField");

  Debug.Log("The field value of YourFloatField is " + myFieldInfo.GetValue(comp));

  myFieldInfo.SetValue(comp, 30.0f);

  Debug.Log("The new field value of YourFloatField is " + myFieldInfo.GetValue(comp));
 }
7. the external script for above code can be:
using System;
using System.Collections.Generic;
using System.Text;
using UnityEngine;
namespace YourClassNameSpace
{
    public class YourClassName : MonoBehaviour
 {
  public float YourFloatField = 1.0f;
  // Use this for initialization
  void Start()
  {

  }

  // Update is called once per frame
  void Update()
  {
   transform.Rotate(Vector3.up, YourFloatField * Time.deltaTime);
  }
 }
}
2017年3月22日 星期三
Unity depth mask using additional camera
reference
sample unity package
Note: this trick doesn't work with Unity SteamVR plugin's CameraRig
Note: this is a different implementation from the depth mask from unity wiki
The basic idea of depth mask is just like normal z-test. You use transparent objects (say mask objects) that are closer to the camera so other objects behind the mask objects will not pass the z-test and not be rendered.
However the problem is that under the same camera rendering, transparent objects can't be considered as passed z-test when opaque objects are behind them.
So the trick is just like the reference link above, use another camera (say camera2) that draws masked object after previous camera(say camera1) rendered the transparent masks.
In this case, camera1 draws first and makes transparent objects write to the z-buffer, then when camera2 is drawing, since the z-buffer is occupied by the transparent objects, the object behind the mask will fail the z-test.
Apparently, the camera1 and camera2 need some settings to achieve the mask effect. Just like the reference link, camera1 needs to render before camera2, so the "depth" property in Unity camera needs to be setup. Just set camera2's depth be larger than camera1's depth to achieve the rendering order.
Then since camera2 draws on top of camera1, camera2's "clear flags" needs to be set as "Don't clear".
Make sure that camera2 has exactly the same camera properties and 3D objects settings as camera1(transforms, fov...), otherwise the rendered scenes will not match.
Add transparent objects into the scene as mask. The transparent objects need to write into the z-buffer, you can use the shader code below to achieve this.
Finally, add a User Layer in Unity (say MaskedObject as the layer name), set masked object to be in the MaskedObject layer, set camera2's culling mask to MaskedObject, then try to move the masked object behind the transparent masks.

here is the result

the moving cube is masked at certain positions, those positions actually are occupied by transparent cubes and the transparent cubes occlude the masked cube.
the shader code for transparent mask object
sample unity package
Note: this trick doesn't work with Unity SteamVR plugin's CameraRig
Note: this is a different implementation from the depth mask from unity wiki
The basic idea of depth mask is just like normal z-test. You use transparent objects (say mask objects) that are closer to the camera so other objects behind the mask objects will not pass the z-test and not be rendered.
However the problem is that under the same camera rendering, transparent objects can't be considered as passed z-test when opaque objects are behind them.
So the trick is just like the reference link above, use another camera (say camera2) that draws masked object after previous camera(say camera1) rendered the transparent masks.
In this case, camera1 draws first and makes transparent objects write to the z-buffer, then when camera2 is drawing, since the z-buffer is occupied by the transparent objects, the object behind the mask will fail the z-test.
Apparently, the camera1 and camera2 need some settings to achieve the mask effect. Just like the reference link, camera1 needs to render before camera2, so the "depth" property in Unity camera needs to be setup. Just set camera2's depth be larger than camera1's depth to achieve the rendering order.
Then since camera2 draws on top of camera1, camera2's "clear flags" needs to be set as "Don't clear".
Make sure that camera2 has exactly the same camera properties and 3D objects settings as camera1(transforms, fov...), otherwise the rendered scenes will not match.
Add transparent objects into the scene as mask. The transparent objects need to write into the z-buffer, you can use the shader code below to achieve this.
Finally, add a User Layer in Unity (say MaskedObject as the layer name), set masked object to be in the MaskedObject layer, set camera2's culling mask to MaskedObject, then try to move the masked object behind the transparent masks.

here is the result
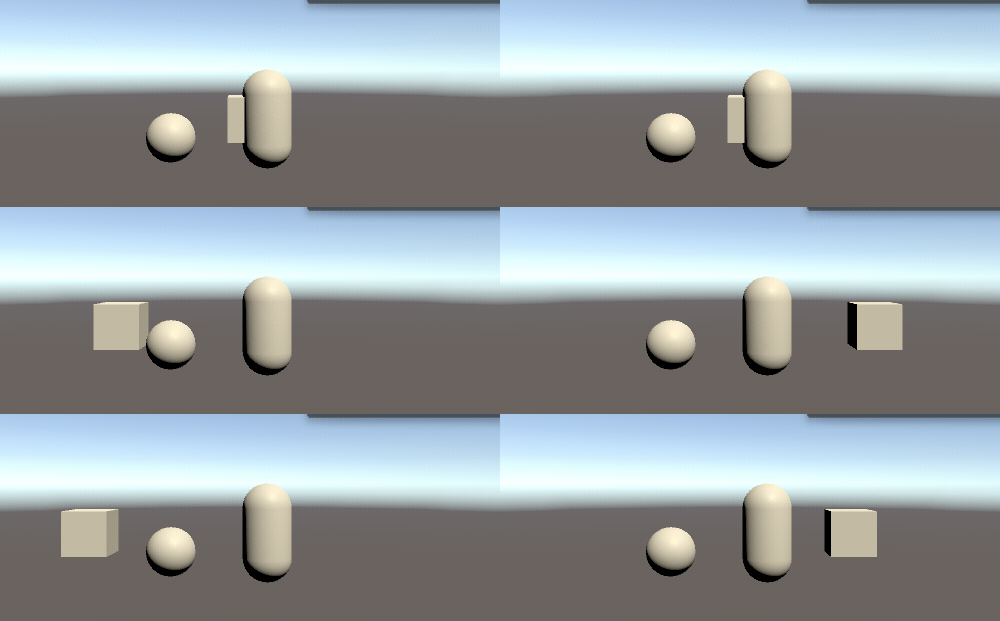
the moving cube is masked at certain positions, those positions actually are occupied by transparent cubes and the transparent cubes occlude the masked cube.
the shader code for transparent mask object
Shader "SimpleTransparentZWrite"
{
 SubShader
 {
  Tags{ "Queue" = "Transparent" }
  Pass{
   Blend SrcAlpha OneMinusSrcAlpha
   ZTest LEqual
   Cull Back

   ZWrite On
   CGPROGRAM
   #pragma vertex vert
   #pragma fragment frag
   #include "UnityCG.cginc"
   struct appdata {
    float4 vertex : POSITION;
   };
   struct v2f {
    float4 pos : SV_POSITION;
   };
   v2f vert(appdata v) {
    v2f o;
    o.pos = UnityObjectToClipPos(v.vertex);
    return o;
   }
   half4 frag(v2f i) : SV_Target{
    return half4(0,0,0,0.0);
   }
   ENDCG
  }
 }
}
2017年3月8日 星期三
Windows Node JS app deployed on heroku(using GitHub)
03/14/2017 update: add new heroku deploy notes about modifying the app entry point. if the entry point is not modified, the heroku server always runs the heroku NodeJS sample
1. Download NodeJS here: https://nodejs.org/en/download/ , install NodeJS
2. Go to GitHub and create a repository: https://github.com/

my repository name is TestNodeJS
3. Go to heroku and create an app: https://dashboard.heroku.com/apps

my heroku app name is myynodejstest
4. Setup heroku's NodeJS sample (follow the steps in the link): https://devcenter.heroku.com/articles/getting-started-with-nodejs#introduction
clone heroku NodeJS sample:
https://devcenter.heroku.com/articles/getting-started-with-nodejs#prepare-the-app
5. git push the heroku NodeJS sample to the GitHub repository created in step 2
6. link GitHub repository to heroku app and deploy to heroku
go to your heroku app dashboard: https://dashboard.heroku.com/apps/your_app_name
press the Deploy button

connect to the GitHub repository of your NodeJS project

deploy the GitHub repository branch

7. check your app by the link: https://your_heroku_app_name.herokuapp.com/
8. Windows NodeJS dev environment setup:
to make npm module globally accessible, you need to add npm module path to user's environment variable:
variable name: NODE_PATH
variable value: %USERPROFILE%\AppData\Roaming\npm\node_modules
for more info, please check here: http://stackoverflow.com/questions/9587665/nodejs-cannot-find-installed-module-on-windows
9. modify app entry point(03/14/2017 added)
not so sure but I changed the following fields
-"app.json" - repository
-"package.json" - main, scripts.start
-"Procfile" - web: node {your_entry_point_file}(your server.js)
10 other things need to be noticed
- npm package dependencies: need to modify "package.json" - dependencies
- server's port: please use "port = process.env.PORT || 5000", if heroku can't bind the port
1. Download NodeJS here: https://nodejs.org/en/download/ , install NodeJS
2. Go to GitHub and create a repository: https://github.com/

my repository name is TestNodeJS
3. Go to heroku and create an app: https://dashboard.heroku.com/apps

my heroku app name is myynodejstest
4. Setup heroku's NodeJS sample (follow the steps in the link): https://devcenter.heroku.com/articles/getting-started-with-nodejs#introduction
clone heroku NodeJS sample:
https://devcenter.heroku.com/articles/getting-started-with-nodejs#prepare-the-app
5. git push the heroku NodeJS sample to the GitHub repository created in step 2
6. link GitHub repository to heroku app and deploy to heroku
go to your heroku app dashboard: https://dashboard.heroku.com/apps/your_app_name
press the Deploy button

connect to the GitHub repository of your NodeJS project

deploy the GitHub repository branch

7. check your app by the link: https://your_heroku_app_name.herokuapp.com/
8. Windows NodeJS dev environment setup:
to make npm module globally accessible, you need to add npm module path to user's environment variable:
variable name: NODE_PATH
variable value: %USERPROFILE%\AppData\Roaming\npm\node_modules
for more info, please check here: http://stackoverflow.com/questions/9587665/nodejs-cannot-find-installed-module-on-windows
9. modify app entry point(03/14/2017 added)
not so sure but I changed the following fields
-"app.json" - repository
-"package.json" - main, scripts.start
-"Procfile" - web: node {your_entry_point_file}(your server.js)
10 other things need to be noticed
- npm package dependencies: need to modify "package.json" - dependencies
- server's port: please use "port = process.env.PORT || 5000", if heroku can't bind the port
訂閱:
文章 (Atom)