-->

分類

2021年8月14日 星期六

Vive Focus 3 無線串流SteamVR設定

此為Vive Focus3使用無線串流的簡易說明,若有問題或需要補充的可在底下留言謝謝


1. 基本說明:


2. 系統及硬體需求


要使用無線串流,請特別注意路由器的Wi-Fi是否有到需求標準

3. 軟體安裝:

安裝SteamVR

點此下載Steam 下載後請安裝於電腦上


開啟電腦上的Steam並登入


開啟Steam商店頁, 搜尋SteamVR


往下捲,安裝SteamVR並執行


接下來請安裝Vive Business串流軟體

點此下載Vive Business串流軟體  下載後請安裝於電腦上


3. 進行串流

先確認電腦及Focus 3連至同一網路

開啟Vive Business串流


會看到他進入待機狀態


若此畫面閃一下就消失表示,可先嘗試更新顯示卡驅動

若為NVIDIA之顯示卡, 可嘗試做以下設定(參考連結)


可先檢查是否有更新再繼續


到Focus 3裡執行串流App並點選VBS Server


若成功, SteamVR應會顯示如下:


4. 開啟遊戲或VR內容

可以從Steam上找一些免費VR內容(例如Google Earth VR)來使用
在Focus 3中按左手把的menu鍵可以選擇已安裝之遊戲來啟動

2018年12月20日 星期四

[Unity] fixed legacy blur effect from Unity Standard Assets for single pass stereo

https://assetstore.unity.com/packages/essentials/legacy-image-effects-83913

using System.Collections;
using System.Collections.Generic;
using UnityEngine;
using UnityStandardAssets.ImageEffects;

[ExecuteInEditMode]
[RequireComponent(typeof(Camera))]
[AddComponentMenu("Image Effects/Blur/Blur (Optimized) Stereo")]
public class BlurOptimizedStereo : PostEffectsBase
{

    [Range(0, 2)]
    public int downsample = 1;

    public enum BlurType
    {
        StandardGauss = 0,
        SgxGauss = 1,
    }

    [Range(0.0f, 10.0f)]
    public float blurSize = 3.0f;

    [Range(1, 4)]
    public int blurIterations = 2;

    public BlurType blurType = BlurType.StandardGauss;

    public Shader blurShader = null;
    private Material blurMaterial = null;

    private Material bypassStereoMaterial = null;
    private Shader bypassStereoShader = null;
    public override bool CheckResources()
    {
        CheckSupport(false);
        if(blurShader == null)
        {
            blurShader = Shader.Find("Hidden/FastBlur");
        }
        blurMaterial = CheckShaderAndCreateMaterial(blurShader, blurMaterial);
        if (bypassStereoMaterial == null)
        {
            bypassStereoShader = Shader.Find("Hidden/BypassStereoImageEffectShader");
            bypassStereoMaterial = new Material(bypassStereoShader);
        }
        if (!isSupported)
            ReportAutoDisable();
        return isSupported;
    }

    public void OnDisable()
    {
        if (blurMaterial)
            DestroyImmediate(blurMaterial);
    }

    public void OnRenderImage(RenderTexture source, RenderTexture destination)
    {
        if (CheckResources() == false)
        {
            Graphics.Blit(source, destination);
            return;
        }

        float widthMod = 1.0f / (1.0f * (1 << downsample));

        blurMaterial.SetVector("_Parameter", new Vector4(blurSize * widthMod, -blurSize * widthMod, 0.0f, 0.0f));
        source.filterMode = FilterMode.Bilinear;

        int rtW = source.width >> downsample;
        int rtH = source.height >> downsample;

        // downsample
        RenderTexture rt = RenderTexture.GetTemporary(rtW, rtH, 0, source.format);

        rt.filterMode = FilterMode.Bilinear;
        Graphics.Blit(source, rt, blurMaterial, 0);

        var passOffs = blurType == BlurType.StandardGauss ? 0 : 2;

        for (int i = 0; i < blurIterations; i++)
        {
            float iterationOffs = (i * 1.0f);
            blurMaterial.SetVector("_Parameter", new Vector4(blurSize * widthMod + iterationOffs, -blurSize * widthMod - iterationOffs, 0.0f, 0.0f));

            // vertical blur
            RenderTexture rt2 = RenderTexture.GetTemporary(rtW, rtH, 0, source.format);
            rt2.filterMode = FilterMode.Bilinear;
            Graphics.Blit(rt, rt2, blurMaterial, 1 + passOffs);
            RenderTexture.ReleaseTemporary(rt);
            rt = rt2;

            // horizontal blur
            rt2 = RenderTexture.GetTemporary(rtW, rtH, 0, source.format);
            rt2.filterMode = FilterMode.Bilinear;
            Graphics.Blit(rt, rt2, blurMaterial, 2 + passOffs);
            RenderTexture.ReleaseTemporary(rt);
            rt = rt2;
        }

        Graphics.Blit(rt, destination, bypassStereoMaterial);

        RenderTexture.ReleaseTemporary(rt);
    }
}


Shader "Hidden/BypassStereoImageEffectShader"
{
 Properties
 {
  _MainTex ("Texture", 2D) = "white" {}
 }
 SubShader
 {
  // No culling or depth
  Cull Off ZWrite Off ZTest Always

  Pass
  {
   CGPROGRAM
   #pragma vertex vert
   #pragma fragment frag
   
   #include "UnityCG.cginc"

   struct appdata
   {
    float4 vertex : POSITION;
    float2 uv : TEXCOORD0;
   };

   struct v2f
   {
    float2 uv : TEXCOORD0;
    float4 vertex : SV_POSITION;
   };


   sampler2D _MainTex;
   float4 _MainTex_ST;

   v2f vert (appdata v)
   {
    v2f o;
    o.vertex = UnityObjectToClipPos(v.vertex);
    //o.uv = v.uv;
    o.uv = UnityStereoScreenSpaceUVAdjust(v.uv, _MainTex_ST);
    return o;
   }


   fixed4 frag (v2f i) : SV_Target
   {
#if UNITY_SINGLE_PASS_STEREO
    if (unity_StereoEyeIndex == 0)//left eye
    {
     i.uv.x = i.uv.x * 0.5;
    }
    else//right eye
    {
     i.uv.x = i.uv.x * 0.5 + 0.5;
    }
#endif
    fixed4 col = tex2D(_MainTex, i.uv);
    return col;
   }
   ENDCG
  }
 }
}


2018年12月4日 星期二

[Unity]Unity's coroutine can't be stopped if the IEnumerator call stack is too deep

Unity's coroutine can't be stopped if the IEnumerator call stack is too deep

In the following example, if  Co3() is executed, then the coroutine can't be stopped by StopCoroutine()

public class TestCoroutine : MonoBehaviour {
    private Coroutine coroutine;
 // Use this for initialization
 void Start () {
        coroutine = StartCoroutine(Co1());
 }
 
 // Update is called once per frame
 void Update () {
  if(Input.GetKeyDown(KeyCode.S))
        {
            if(coroutine != null)
            {
                StopCoroutine(coroutine);
                Debug.LogError("Stop coroutine");
            }
        }
 }

    private IEnumerator Co1()
    {
        Debug.LogError("Co1 start");

        yield return new WaitForSeconds(5);
        Debug.LogError("Co1 end");
        yield return Co2();

    }

    private IEnumerator Co2()
    {
        Debug.LogError("Co2 start");
        float time = Time.time;
        while(Time.time - time < 5)
        {
            yield return null;
        }
        Debug.LogError("Co2 end");
        yield return Co3();
    }

    private IEnumerator Co3()
    {
        //coroutine can't be stopped by StopCoroutine if here is executed
        Debug.LogError("Co3 start");
        float time = Time.time;
        while (Time.time - time < 5)
        {
            yield return null;
        }
        Debug.LogError("Co3 end");

    }
}

2018年9月13日 星期四

Windows build WebRTC for unity plugin

just notes about building webrtc unity plugin

ref: https://webrtc.org/native-code/development/


System requirements

  • A 64-bit Intel machine with at least 8GB of RAM. More than 16GB is highly recommended.
  • At least 100GB of free disk space on an NTFS-formatted hard drive. FAT32 will not work, as some of the Git packfiles are larger than 4GB.
  • An appropriate version of Visual Studio, as described below.
  • Windows 7 or newer.

Setting up Windows

Visual Studio

As of September, 2017 (R503915) Chromium requires Visual Studio 2017 (15.7.2) to build. The clang-cl compiler is used but Visual Studio's header files, libraries, and some tools are required. Visual Studio Community Edition should work if its license is appropriate for you. You must install the “Desktop development with C++” component and the “MFC and ATL support” sub-component. This can be done from the command line by passing these arguments to the Visual Studio installer that you download:
--add Microsoft.VisualStudio.Workload.NativeDesktop
    --add Microsoft.VisualStudio.Component.VC.ATLMFC --includeRecommended
You must have the version 10.0.17134 Windows 10 SDK installed. This can be installed separately or by checking the appropriate box in the Visual Studio Installer.
The SDK Debugging Tools must also be installed. If the Windows 10 SDK was installed via the Visual Studio installer, then they can be installed by going to: Control Panel → Programs → Programs and Features → Select the “Windows Software Development Kit” → Change → Change → Check “Debugging Tools For Windows” → Change. Or, you can download the standalone SDK installer and use it to install the Debugging Tools.

Install depot_tools

Download the depot_tools bundle and extract it somewhere.
Warning: DO NOT use drag-n-drop or copy-n-paste extract from Explorer, this will not extract the hidden “.git” folder which is necessary for depot_tools to autoupdate itself. You can use “Extract all…” from the context menu though.
Add depot_tools to the start of your PATH (must be ahead of any installs of Python). Assuming you unzipped the bundle to C:\src\depot_tools, open:
Control Panel → System and Security → System → Advanced system settings
If you have Administrator access, Modify the PATH system variable and put C:\src\depot_tools at the front (or at least in front of any directory that might already have a copy of Python or Git).
If you don't have Administrator access, you can add a user-level PATH environment variable and put C:\src\depot_tools at the front, but if your system PATH has a Python in it, you will be out of luck.
Also, add a DEPOT_TOOLS_WIN_TOOLCHAIN system variable in the same way, and set it to 0. This tells depot_tools to use your locally installed version of Visual Studio (by default, depot_tools will try to use a google-internal version).
From a cmd.exe shell, run the command gclient (without arguments). On first run, gclient will install all the Windows-specific bits needed to work with the code, including msysgit and python.
  • If you run gclient from a non-cmd shell (e.g., cygwin, PowerShell), it may appear to run properly, but msysgit, python, and other tools may not get installed correctly.
  • If you see strange errors with the file system on the first run of gclient, you may want to disable Windows Indexing.
After running gclient open a command prompt and type where python and confirm that the depot_tools python.bat comes ahead of any copies of python.exe. Failing to ensure this can lead to overbuilding when using gn - see crbug.com/611087.

11/29/2018 update
Install Windows sdk then
1. add a LIB system variable then set its values as Windows SDK lib folders (e.g.  C:\Program Files (x86)\Windows Kits\10\Lib\10.0.17763.0\ucrt\x64,  C:\Program Files (x86)\Windows Kits\10\Lib\10.0.17763.0\ucrt_enclave\x64, C:\Program Files (x86)\Windows Kits\10\Lib\10.0.17763.0\um\x64, ...)

2. add a INCLUDE system variable then set its values as Windows SDK include folders (e.g. C:\Program Files (x86)\Windows Kits\10\Include\10.0.17763.0\ucrt, C:\Program Files (x86)\Windows Kits\10\Include\10.0.17763.0\shared, C:\Program Files (x86)\Windows Kits\10\Include\10.0.17763.0\um, ...)

Get the code

First, configure Git:
$ git config --global user.name "My Name"
$ git config --global user.email "my-name@chromium.org"
$ git config --global core.autocrlf false
$ git config --global core.filemode false
$ git config --global branch.autosetuprebase always


Add System Variable or User Variable of Environment Variables: 
name: GYP_MSVS_OVERRIDE_PATH
value: path to MSVS 2017 (e.g. D:\VisualStudioInstall\2017\Community)

restart cmd

$mkdir webrtc-checkout
$cd webrtc-checkout
$webrtc-checkout>fetch --nohooks webrtc
$webrtc-checkout>gclient sync
$webrtc-checkout>git config branch.autosetupmerge always
$webrtc-checkout>git config branch.autosetuprebase always
$webrtc-checkout>cd src
$webrtc-checkout\src>git checkout master
$webrtc-checkout\src>git new-branch your-branch-name   
$webrtc-checkout\src>ninja -C out/Default webrtc_unity_plugin
$webrtc-checkout\src>gn gen --ide=vs out/VS //this will generate a file called "all.sln" in webrtc-checkout\src\out\VS, you can open it by MSVS

gn set args(optional):
$gn gen out/Default --args="target_os=\"win\" target_cpu=\"x64\""

then modify files in webrtc-checkout\src\examples\unityplugin

if new files are added, webrtc-checkout\src\examples\BUILD.gn needs to be modified. Suppose you add new files in webrtc-checkout\src\examples\unityplugin, then find the following part and add your new files:


if (is_win || is_android) {

  rtc_shared_library("webrtc_unity_plugin") {

    testonly = true

    sources = [

      "unityplugin/simple_peer_connection.cc",
      "unityplugin/simple_peer_connection.h",
      "unityplugin/unity_plugin_apis.cc",
      "unityplugin/unity_plugin_apis.h",
      "unityplugin/video_observer.cc",
      "unityplugin/video_observer.h",
      "unityplugin/your_new_file.cc",
      "unityplugin/your_new_file.h",
    ]

Updating the Code
Update your current branch with:

$webrtc-checkout\src>git checkout master
$webrtc-checkout\src>git pull origin master
$webrtc-checkout\src>gclient sync
$webrtc-checkout\src>git checkout my-branch
$webrtc-checkout\src>git merge master

To clean all build artifacts in a directory but leave the current GN configuration untouched (stored in the args.gn file), do:

$webrtc-checkout\src>gn clean out/Default

if you keep getting compile error, try
1. restart cmd
2.
$webrtc-checkout\src>gn clean out/Default
$webrtc-checkout\src>gn gen --ide=vs out/VS 
$webrtc-checkout\src>ninja -C out/Default webrtc_unity_plugin

Unity plugin trouble shooting:

Create data channel failed:
https://groups.google.com/forum/?utm_medium=email&utm_source=footer#!msg/discuss-webrtc/XRkuUS30ahc/aZ8yCuEFBgAJ

stun servers:
https://stackoverflow.com/questions/20068944/webrtc-stun-stun-l-google-com19302/20134888#20134888


some implementation details for webrtc Unity plugin:

Basically I just modify the src/examples/unityplugin

I created a customized VideoCapturer  (say MyVideoCapturer) and make SimplePeerConnection::OpenVideoCaptureDevice return MyVideoCapturer

(I need to create fake device and fake device module for MyVideoCapturer, see FakeWebRtcDeviceInfo class)

MyVideoCapturer takes unity texture's rgb data then convert it to I420 and call OnFrame to send the VideoFrame out

(Sorry, lazy to format the code) code snippet (data is rgba8888 byte array from Unity):
///////////////////////////////////////////////////
 //https://www.jianshu.com/p/050234c5fff2    this really helps!
 int yuvBufSize = width * height * 3 / 2;
  uint8_t* yuvBuf = new uint8_t[yuvBufSize];

  // source-stride
  int Dst_Stride_Y = width;
  const int uv_stride = (width + 1) / 2;

  // source-length
  const int y_length = width * height;
  int uv_length = uv_stride * ((height + 1) / 2);

  // source-data
  unsigned char* Y_data_Dst = yuvBuf;
  unsigned char* U_data_Dst = yuvBuf + y_length;
  unsigned char* V_data_Dst = U_data_Dst + uv_length;

  libyuv::ABGRToI420(data, width * 4, Y_data_Dst, Dst_Stride_Y,
                     U_data_Dst, uv_stride, V_data_Dst, uv_stride, width,
                     height);

  rtc::scoped_refptr<webrtc::I420Buffer> buffer =
      webrtc::I420Buffer::Copy(width, height, Y_data_Dst, Dst_Stride_Y, U_data_Dst, uv_stride, V_data_Dst, uv_stride);

  webrtc::VideoFrame frame = webrtc::VideoFrame::Builder().set_video_frame_buffer(buffer).build();

//video capturer OnFrame(frame)
////////////////////////////////////////////////////////////
kind of working...


2018年7月25日 星期三

[Unity] Modify project define symbols when executing scripts in -batchmode

Sometimes you need to add/remove project define symbols to achieve conditional compilation.

When the Unity Editor is running in GUI mode, this can be done by calling PlayerSettings.SetScriptingDefineSymbolsForGroup, but this trick doesn't work when you run Unity Editor in batch mode.

To modify the define symbols in batch mode, we need to modify the ProjectSettings by SerializedObject class.

Here is the example for modifying define symbols for standalone platform:

    string ProjectSettingsAssetPath = "ProjectSettings/ProjectSettings.asset";
    SerializedObject projectSettingsManager = new SerializedObject(UnityEditor.AssetDatabase.LoadAllAssetsAtPath(ProjectSettingsAssetPath)[0]);
    SerializedProperty scriptingDefineSymbols = projectSettingsManager.FindProperty("scriptingDefineSymbols");
    SerializedProperty standaloneDefineSymbols = scriptingDefineSymbols.GetArrayElementAtIndex(0);//standalone platform is at index 0
    standaloneDefineSymbols = standaloneDefineSymbols.FindPropertyRelative("second");
    AddOrRemoveDefineSymbols(standaloneDefineSymbols, true, "YOUR_DEFINE_SYMBOL");

    public void AddOrRemoveDefineSymbols(SerializedProperty standaloneDefineSymbols, bool add, string defineSymbol)
    {
        string defineSymbolsValue = standaloneDefineSymbols.stringValue;
        List defineStrings = new List(defineSymbolsValue.Split(';'));
        if(add)
        {
            if (defineStrings.Contains(defineSymbol)) { return; }
            defineStrings.Add(defineSymbol);
            standaloneDefineSymbols.stringValue = string.Join(";", defineStrings.ToArray());
            projectSettingsManager.ApplyModifiedProperties();
        }
        else
        {
            if (!defineStrings.Contains(defineSymbol)) { return; }
            defineStrings.Remove(defineSymbol);
            standaloneDefineSymbols.stringValue = string.Join(";", defineStrings.ToArray());
            projectSettingsManager.ApplyModifiedProperties();
        }
    }


You can check the file "ProjectSettings.asset" to investigate the data structure:


2018年3月11日 星期日

[VR] create OpenVR Overlay by C#

reference:
https://github.com/ViveIsAwesome/OpenVROverlayTest/blob/master/OpenVROverlayTest/Program.cs
https://gist.github.com/naveedmurtuza/6600103

dependency:
https://github.com/ValveSoftware/openvr/blob/master/headers/openvr_api.cs
https://github.com/ValveSoftware/openvr/tree/master/bin/win64

Here is the code to create an OpenVR overlay by C# and display text in the overlay


//Program.cs
using System;
using System.Collections.Generic;
using System.Drawing;
using System.Drawing.Drawing2D;
using System.Drawing.Imaging;
using System.Drawing.Text;
using System.IO;
using System.Linq;
using System.Reflection;
using System.Runtime.InteropServices;
using System.Text;
using System.Threading;
using System.Threading.Tasks;
using Valve.VR;

namespace CSOpenVROverlayTest
{
    class Program
    {
        public static CVRSystem hmd { get; private set; }
        public static CVRCompositor compositor { get; private set; }
        public static CVROverlay overlay { get; private set; }
        private static int stringIndex = 0;

        //ref: https://github.com/ViveIsAwesome/OpenVROverlayTest/blob/master/OpenVROverlayTest/Program.cs
        static void Main(string[] args)
        {
            string ResourcePath = new FileInfo(Assembly.GetEntryAssembly().Location).Directory.FullName + "/Resources/";
            // init
            var error = EVRInitError.None;
            
            OpenVR.Init(ref error, EVRApplicationType.VRApplication_Overlay);
            if (error != EVRInitError.None) throw new Exception();

            OpenVR.GetGenericInterface(OpenVR.IVRCompositor_Version, ref error);
            if (error != EVRInitError.None) throw new Exception();

            OpenVR.GetGenericInterface(OpenVR.IVROverlay_Version, ref error);
            if (error != EVRInitError.None) throw new Exception();
            hmd = OpenVR.System;
            compositor = OpenVR.Compositor;
            //compositor.FadeToColor(0.5f, 0, 0, 0, 1, true);
            //compositor.FadeToColor(0.5f, 0, 0, 0, 1, false);

            overlay = OpenVR.Overlay;

            ulong overlayHandle = 0;

            EVROverlayError eVROverlayError;
            eVROverlayError = overlay.CreateOverlay("overlayTestKey", "overlayTest", ref overlayHandle);
            overlay.ShowOverlay(overlayHandle);
            Font font = new Font(FontFamily.GenericSansSerif,
            12.0F, FontStyle.Bold);

            Bitmap textImage = null;
            IntPtr? unmanagedPointer = null;
            DrawTextToOverlay(overlayHandle, displayText, font, Color.Red, 1000, ref textImage, ref unmanagedPointer);

            overlay.SetOverlayWidthInMeters(overlayHandle, 2.5f);

            int count = 0;
            while (true)
            {
                Console.Clear();

                TrackedDevicePose_t[] trackedDevicePose_T = new TrackedDevicePose_t[1];
                hmd.GetDeviceToAbsoluteTrackingPose(ETrackingUniverseOrigin.TrackingUniverseStanding, 0.0f, trackedDevicePose_T);
                HmdMatrix34_t hmdMatrix34_T = trackedDevicePose_T[0].mDeviceToAbsoluteTracking;
                PrintMatrix("hmdMatrix34_T", hmdMatrix34_T);
                Console.WriteLine("");

                HmdVector3_t hmdPos = new HmdVector3_t();
                OpenVRMathHelper.Set(ref hmdPos, hmdMatrix34_T.Element(0, 3), hmdMatrix34_T.Element(1, 3), hmdMatrix34_T.Element(2, 3));
                HmdVector3_t yVec = new HmdVector3_t();
                //make overlay tranform's up vector as (0, 1, 0)
                OpenVRMathHelper.Set(ref yVec, 0.0f, 1.0f, 0.0f);

                //overlay tranform's forward vector (only retain the x and z components to make the overlay upright)
                HmdVector3_t zVec = new HmdVector3_t();
                OpenVRMathHelper.Set(ref zVec, hmdMatrix34_T.Element(0, 2), 0.0f, hmdMatrix34_T.Element(2, 2));
                OpenVRMathHelper.Normalize(ref zVec);

                //calculate overlay transform's right vector
                HmdVector3_t xVec = OpenVRMathHelper.crossHmdVector3t(yVec, zVec);
                OpenVRMathHelper.Normalize(ref xVec);

                HmdVector3_t pos = new HmdVector3_t();
                OpenVRMathHelper.Set(ref pos, ref hmdPos);
                HmdVector3_t forward = new HmdVector3_t();
                OpenVRMathHelper.Set(ref forward, ref zVec);
                OpenVRMathHelper.Scale(ref forward, -5.0f);
                //move overlay along hmd's forward vector from hmd
                OpenVRMathHelper.Add(ref pos, ref forward);
                //PrintVec("hmdPos", hmdPos);
                //PrintVec("xVec", xVec);
                //PrintVec("yVec", yVec);
                //PrintVec("zVec", zVec);
                //PrintVec("forward", forward);
                //PrintVec("pos", pos);
                //Console.WriteLine("");

                HmdMatrix34_t overlayTransform = new HmdMatrix34_t();
                OpenVRMathHelper.Set(ref overlayTransform, ref xVec, ref yVec, ref zVec, ref pos);
                PrintMatrix("overlayTransform", overlayTransform);
                //hmdMatrix34_T.m11 -= 5.0f;
                Console.WriteLine("");
                
                //overlay.SetOverlayTransformAbsolute(overlayHandle, ETrackingUniverseOrigin.TrackingUniverseStanding, ref hmdMatrix34_T);
                overlay.SetOverlayTransformAbsolute(overlayHandle, ETrackingUniverseOrigin.TrackingUniverseStanding, ref overlayTransform);

                //Console.Write(hmdMatrix34_T.m0 + ", " + hmdMatrix34_T.m1 + ", " + hmdMatrix34_T.m2 + ", " + hmdMatrix34_T.m3);Console.WriteLine();
                //Console.Write(hmdMatrix34_T.m4 + ", " + hmdMatrix34_T.m5 + ", " + hmdMatrix34_T.m6 + ", " + hmdMatrix34_T.m7);Console.WriteLine();
                //Console.Write(hmdMatrix34_T.m8 + ", " + hmdMatrix34_T.m9 + ", " + hmdMatrix34_T.m10 + ", " + hmdMatrix34_T.m11);Console.WriteLine();
                //Console.WriteLine();
                Thread.Sleep(10);
                count += 10;
                if(count == 1000)//after 1 sec
                {
                    count = 0;
                    DrawTextToOverlay(overlayHandle, displayText, font, Color.Red, 1000, ref textImage, ref unmanagedPointer);
                }
            }
        }

        public static void PrintMatrix(string name, HmdMatrix34_t matrix)
        {
            Console.WriteLine("matrix: " + name);
            for(int i = 0; i < 3; i++)
            {
                for (int j = 0; j < 4; j++)
                {
                    Console.Write(matrix.Element(i, j) + ", ");
                }
                Console.WriteLine("");

            }
        }

        public static void PrintVec(string name, HmdVector3_t vec)
        {
            Console.WriteLine(name + ": " + vec.v0 + ", " + vec.v1 + ", " + vec.v2);
        }

        public static string displayText
        {
            get
            {
                string result = "";
                switch(stringIndex)
                {
                    case 0:
                        result = "Hi        ";
                        break;
                    case 1:
                        result = "HiHi      ";
                        break;
                    case 2:
                        result = "HiHiHi    ";
                        break;
                    case 3:
                        result = "HiHiHiHi  ";
                        break;
                    case 4:
                        result = "HiHiHiHiHi";
                        break;
                }
                stringIndex = (stringIndex + 1) % 5;
                return result;
            }
        }

        public static void DrawTextToOverlay(ulong overlayHandle, string text, Font font, Color color, int maxWidth, ref Bitmap bitmap, ref IntPtr? intPtr)
        {
            GC.Collect();
            if (bitmap != null) { bitmap.Dispose(); }
            int w, h;
            DrawTextToImage(ref bitmap, text, font, color, maxWidth, out w, out h);
            IntPtr? prevPtr = intPtr;
            byte[] imgBytes = null;
            bitmapToByteArray(bitmap, ref imgBytes);
            intPtr = Marshal.AllocHGlobal(imgBytes.Length);
            Marshal.Copy(imgBytes, 0, intPtr.Value, imgBytes.Length);

            overlay.SetOverlayRaw(overlayHandle, intPtr.Value, (uint)w, (uint)h, 4);
            if (prevPtr.HasValue)
            {
                Marshal.FreeHGlobal(prevPtr.Value);
            }
        }

        //ref: https://gist.github.com/naveedmurtuza/6600103
        public static Bitmap DrawTextToImage(ref Bitmap img, String text, Font font, Color textColor, int maxWidth, out int width, out int height)
        {
            //first, create a dummy bitmap just to get a graphics object
            img = new Bitmap(1, 1);
            Graphics drawing = Graphics.FromImage(img);
            //measure the string to see how big the image needs to be
            string textToMeasure = text.Replace(" ", "_");
            SizeF textSize = drawing.MeasureString(textToMeasure, font, maxWidth);

            //set the stringformat flags to rtl
            StringFormat sf = new StringFormat();
            //uncomment the next line for right to left languages
            //sf.FormatFlags = StringFormatFlags.DirectionRightToLeft;
            sf.Trimming = StringTrimming.Word;
            //free up the dummy image and old graphics object
            img.Dispose();
            drawing.Dispose();

            //create a new image of the right size
            img = new Bitmap((int)textSize.Width, (int)textSize.Height);
            width = (int)textSize.Width;
            height = (int)textSize.Height;
            drawing = Graphics.FromImage(img);
            //Adjust for high quality
            drawing.CompositingQuality = CompositingQuality.HighQuality;
            drawing.InterpolationMode = InterpolationMode.HighQualityBilinear;
            drawing.PixelOffsetMode = PixelOffsetMode.HighQuality;
            drawing.SmoothingMode = SmoothingMode.HighQuality;
            drawing.TextRenderingHint = TextRenderingHint.AntiAliasGridFit;

            //paint the background
            drawing.Clear(Color.Transparent);

            //create a brush for the text
            Brush textBrush = new SolidBrush(textColor);

            drawing.DrawString(text, font, textBrush, new RectangleF(0, 0, textSize.Width, textSize.Height), sf);

            drawing.Save();

            textBrush.Dispose();
            drawing.Dispose();
            return img;
        }

        public static byte[] bitmapToByteArray(Bitmap bitmap, ref byte[] byteArray)
        {
            byteArray = new byte[bitmap.Width * bitmap.Height * 4];
            int width = bitmap.Width;
            int height = bitmap.Height;
            for (int i = 0; i < height; i++)
            {
                for (int j = 0; j < width; j++)
                {
                    Color c = bitmap.GetPixel(j, i);
                    //byteArray[(i * width + j) * 4] = c.A;
                    //byteArray[(i * width + j) * 4 + 1] = c.R;
                    //byteArray[(i * width + j) * 4 + 2] = c.G;
                    //byteArray[(i * width + j) * 4 + 3] = c.B;
                    byteArray[(i * width + j) * 4] = c.R;
                    byteArray[(i * width + j) * 4 + 1] = c.G;
                    byteArray[(i * width + j) * 4 + 2] = c.B;
                    byteArray[(i * width + j) * 4 + 3] = c.A;

                    //Console.WriteLine(c.A);
                    //Console.WriteLine(c.R);
                    //Console.WriteLine(c.G);
                    //Console.WriteLine(c.B);
                    //Console.WriteLine("--");
                }
            }
            return byteArray;
        }
    }
}


//OpenVRMathHelper.cs
using System;
using System.Collections.Generic;
using System.Linq;
using System.Text;
using System.Threading.Tasks;
using Valve.VR;
public static class OpenVRMathHelper
{
    public static float calcHmdVector3tLength(ref HmdVector3_t v)
    {
        return (float)Math.Sqrt(v.v0 * v.v0 + v.v1 * v.v1 + v.v2 * v.v2);
    }

    public static void Set(ref HmdVector3_t vec, float x, float y, float z)
    {
        vec.v0 = x;
        vec.v1 = y;
        vec.v2 = z;
    }

    public static void Normalize(ref HmdVector3_t vec)
    {
        float length = calcHmdVector3tLength(ref vec);
        vec.v0 = vec.v0 / length;
        vec.v1 = vec.v1 / length;
        vec.v2 = vec.v2 / length;
    }

    public static void Scale(ref HmdVector3_t vec, float scale)
    {
        vec.v0 = vec.v0 * scale;
        vec.v1 = vec.v1 * scale;
        vec.v2 = vec.v2 * scale;
    }

    public static void Add(ref HmdVector3_t vec, ref HmdVector3_t vec2)
    {
        vec.v0 = vec.v0 + vec2.v0;
        vec.v1 = vec.v1 + vec2.v1;
        vec.v2 = vec.v2 + vec2.v2;
    }

    public static void Set(ref HmdMatrix34_t matrix, ref HmdVector3_t col0, ref HmdVector3_t col1, ref HmdVector3_t col2, ref HmdVector3_t col3)
    {
        SetElement(ref matrix, 0, 0, col0.v0);
        SetElement(ref matrix, 1, 0, col0.v1);
        SetElement(ref matrix, 2, 0, col0.v2);

        SetElement(ref matrix, 0, 1, col1.v0);
        SetElement(ref matrix, 1, 1, col1.v1);
        SetElement(ref matrix, 2, 1, col1.v2);

        SetElement(ref matrix, 0, 2, col2.v0);
        SetElement(ref matrix, 1, 2, col2.v1);
        SetElement(ref matrix, 2, 2, col2.v2);

        SetElement(ref matrix, 0, 3, col3.v0);
        SetElement(ref matrix, 1, 3, col3.v1);
        SetElement(ref matrix, 2, 3, col3.v2);
    }

    public static void SetElement(ref HmdMatrix34_t matrix, int r, int c, float value)
    {
        switch (r)
        {
            case 0:
                switch (c)
                {
                    case 0:
                        matrix.m0 = value;
                        return;
                    case 1:
                        matrix.m1 = value;
                        return;
                    case 2:
                        matrix.m2 = value;
                        return;
                    case 3:
                        matrix.m3 = value;
                        return;
                }
                break;
            case 1:
                switch (c)
                {
                    case 0:
                        matrix.m4 = value;
                        return;
                    case 1:
                        matrix.m5 = value;
                        return;
                    case 2:
                        matrix.m6 = value;
                        return;
                    case 3:
                        matrix.m7 = value;
                        return;
                }
                break;
            case 2:
                switch (c)
                {
                    case 0:
                        matrix.m8 = value;
                        return;
                    case 1:
                        matrix.m9 = value;
                        return;
                    case 2:
                        matrix.m10 = value;
                        return;
                    case 3:
                        matrix.m11 = value;
                        return;
                }
                break;
        }
    }
}

2018年1月12日 星期五

[Unity] use script to modify the value of SteamVR_AutoEnableVR and Virtual Reality Supported in PlayerSettings


reference: modify project settings via script
reference: YAML syntax

If somehow you need to build a non-VR version executable (e.g. for testing purpose) for your VR game, you need to turn off the VR support. Normally you can turn off VR support via the settings windows as the following:

normal way to set SteamVR Automatically Enable VR: Edit->Preferences->SteamVR


normal way to set Virtual Reality Supported: File->Build Settings->Player Settings->Other Settings


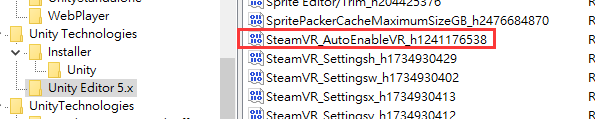
SteamVR Automatically Enable VR is a bool value of EditorPref, you can find its key in the Windows registry(if you are using Windows). The registry path is
[HKEY_CURRENT_USER\Software\Unity Technologies\Unity Editor 5.x]
if you are using Unity 5.x


Virtual Reality Supported is a bool value which is serialized by YAML format in YourProject/ProjectSettings/ProjectSettings.asset


If you need to change these settings values frequently, you can try to use script to do the switch for convenience.

To use script to modify the settings, first make sure Asset Serialization(Edit->Project Settings->Editor->Asset Serialization) is set as Force Text

Then use the following script to create an EditorWindow that can modify the value of SteamVR Automatically Enable VR(if you installed SteamVR plugin) and the value of Virtual Reality Supported in PlayerSettings

Note: different Unity versions may have different data structures for storing the ProjectSettings, so make sure you checked the content of ProjectSettings.asset and modify the script in order to access the values correctly 

public class EditorSettingsTestEditorWindow : EditorWindow
{

    [MenuItem("Window/EditorSettingsTestEditorWindow")]
    static void Init()
    {
        // Get existing open window or if none, make a new one:
        EditorSettingsTestEditorWindow window = (EditorSettingsTestEditorWindow)EditorWindow.GetWindow(typeof(EditorSettingsTestEditorWindow));
        window.Show();
    }
    const string ProjectSettingsAssetPath = "ProjectSettings/ProjectSettings.asset";

    private bool bSteamVRAutoEnable = false;
    private bool bVRSupported = false;
    private SerializedProperty BuildTargetVRSettings;
    private SerializedObject projectSettingsManager;
    private void OnEnable()
    {
        bSteamVRAutoEnable = EditorPrefs.GetBool("SteamVR_AutoEnableVR");
        Debug.Log("bSteamVRAutoEnable: " + bSteamVRAutoEnable);

        projectSettingsManager = new SerializedObject(UnityEditor.AssetDatabase.LoadAllAssetsAtPath(ProjectSettingsAssetPath)[0]);
        BuildTargetVRSettings = projectSettingsManager.FindProperty("m_BuildTargetVRSettings");
        int arrSize = BuildTargetVRSettings.arraySize;
        for(int i = 0; i < arrSize; i++)
        {
            SerializedProperty element = BuildTargetVRSettings.GetArrayElementAtIndex(i);

            SerializedProperty buildTarget = element.FindPropertyRelative("m_BuildTarget");
            string buildTargetValue = buildTarget.stringValue;
            if(buildTargetValue == "Standalone")
            {
                SerializedProperty enabled = element.FindPropertyRelative("m_Enabled");
                bVRSupported = enabled.boolValue;
                Debug.Log("got vr supported: " + bVRSupported);
            }
        }
    }
    void OnGUI()
    {
        bool tempSteamVRAutoEnable = bSteamVRAutoEnable;
        tempSteamVRAutoEnable = EditorGUILayout.ToggleLeft("SteamVR_AutoEnableVR", bSteamVRAutoEnable);
        if(tempSteamVRAutoEnable != bSteamVRAutoEnable)
        {
            bSteamVRAutoEnable = tempSteamVRAutoEnable;
            EditorPrefs.SetBool("SteamVR_AutoEnableVR", bSteamVRAutoEnable);
        }

        bool tempVRSupported = bVRSupported;

        tempVRSupported = EditorGUILayout.ToggleLeft("vr supported", bVRSupported);
        if(tempVRSupported != bVRSupported)
        {
            bVRSupported = tempVRSupported;
            int arrSize = BuildTargetVRSettings.arraySize;
            for (int i = 0; i < arrSize; i++)
            {
                SerializedProperty element = BuildTargetVRSettings.GetArrayElementAtIndex(i);

                SerializedProperty buildTarget = element.FindPropertyRelative("m_BuildTarget");
                string buildTargetValue = buildTarget.stringValue;
                if (buildTargetValue == "Standalone")
                {
                    SerializedProperty enabled = element.FindPropertyRelative("m_Enabled");
                    enabled.boolValue = bVRSupported;
                    projectSettingsManager.ApplyModifiedProperties();
                }
            }
        }
    }
}

2017年7月11日 星期二

[Note] Unity Profiler enhancement

split binary profiler data (in order to view more frames in profiler):
http://www.itdadao.com/articles/c19a766424p0.html

calculate FPS:
https://github.com/MattRix/UnityDecompiled/blob/master/UnityEditor/UnityEditor/GameViewGUI.cs
http://www.jianshu.com/p/1c22321d88af
https://gamedev.stackexchange.com/questions/118934/unity-stats-framerate-vs-time-deltatime
note about FPS calculation:
1. UnityStats.frameTime, UnityStats.renderTime seem can only be read in OnGUI()
2. the FPS in Profiler(and Unity stats window) seems to match the value (1.0f / (UnityStats.frameTime + UnityStats.renderTime)), not sure but currently my experimental results match the calculation

package download link:
https://drive.google.com/file/d/1weD2QOAh7wyUWINor8Na0Ix-d__15vlv/view?usp=sharing

2017年6月8日 星期四

[Note] convert transform matrix from right-handed coordinate system to left-handed coordinate system

Rotation:
angle: rotate negated angle
axis: negate z component

https://butterflyofdream.wordpress.com/2016/07/05/converting-rotation-matrices-of-left-handed-coordinate-system/
https://www.evl.uic.edu/ralph/508S98/coordinates.html

Translation:
negate z component

Then you have things like SteamVR pose to Unity pose conversion in SteamVR_Utils in Unity's SteamVR plugin:

                 public RigidTransform(HmdMatrix34_t pose)
{
var m = Matrix4x4.identity;

m[0, 0] =  pose.m0;
m[0, 1] =  pose.m1;
m[0, 2] = -pose.m2;
m[0, 3] =  pose.m3;

m[1, 0] =  pose.m4;
m[1, 1] =  pose.m5;
m[1, 2] = -pose.m6;
m[1, 3] =  pose.m7;

m[2, 0] = -pose.m8;
m[2, 1] = -pose.m9;
m[2, 2] =  pose.m10;
m[2, 3] = -pose.m11;

this.pos = m.GetPosition();
this.rot = m.GetRotation();
}

2017年4月23日 星期日

Unity UGUI text underline

reference


using UnityEngine;
using System.Collections;
using UnityEngine.UI;
public class TextUnderline : MonoBehaviour {
 //Text that draws underline
 public Text underline;

 /*
  refText: Text that its text content will be underlined
  clear: clear underline
  underlineVerticalOffsetScale: control distance between refText and underline
 
  sample hierarchy structure:

  refText(components: Text)
   underline(components: Text, TextUnderline)   
 */
 public void setup(Text refText, bool clear = false, float underlineVerticalOffsetScale = 1.0f)
 {
  if(clear)
  {
   underline.text = "";
   return;
  }
  RectTransform rt = underline.GetComponent();
  RectTransform refRT = refText.GetComponent();

  underline.font = refText.font;
  underline.fontSize = refText.fontSize;
  //underline.fontStyle = refText.fontStyle;
  underline.color = refText.color;
  underline.text = "_";

  rt.localScale = refRT.localScale;
  float refHeight = refText.preferredHeight;

  float perlineWidth = underline.preferredWidth * rt.localScale.x;
  Debug.Log(perlineWidth);

  float refWidth = refText.preferredWidth;
  int lineCount = (int)Mathf.Round(refWidth / perlineWidth);
  Debug.Log(lineCount);
  for (int i = 1; i < lineCount; i++)
  {
   underline.text += "_";
  }

  float selfHeight = underline.preferredHeight;
  rt.anchoredPosition = new Vector2(0.0f, -(refHeight + selfHeight) * underlineVerticalOffsetScale);
 }
}


2017年4月4日 星期二

Unity load external script at runtime(using Visual Studio)

reference link

To load external script into Unity at runtime, the external script needs to be compiled as assembly(.dll), here are steps to do so.

1. Create a new C# project with Visual Studio, choose the project type as "Class Library"
2. Add UnityEngine.dll as project reference, the UnityEngine.dll is located at "<Unity_Install_Path>\Editor\Data\Managed". Add the dll to project reference by the following steps: 
right click project name in Solution Explorer -> Properties -> Reference Paths -> Folder -> browse to find the folder that contains .dll -> Add Folder


right click "References" in Solution Explorer -> Add References -> Assembly -> search the dll you added

3. in the created Class Library project, create a class that extends MonoBehaviour like what we usually do in Unity, you can implement its Start(), Update()...

4. Release build this library project and remember the path to the .dll created by this library project

5. use the WWWAssemblyLoader in the reference link above or my modified assembly loader below:


using UnityEngine;
using System.Collections;
using System;
using System.Reflection;

public class MyWWWAssemblyLoader
{

 public IEnumerator loadAssembly(string url, Action finishCallback)
 {
  if(url == null || finishCallback == null)
  {
   yield break;
  }
  WWW m_WWW = new WWW(url);
  while(!m_WWW.isDone)
  {
   yield return null;
  }

  Assembly assembly = LoadAssembly(m_WWW);
  if (assembly != null)
  {
   Debug.Log("load assembly: " + url + " Done");
   finishCallback(true, url, assembly);
  }
  else
  {
   Debug.Log("load assembly: " + url + " Failed");
   finishCallback(false, url, assembly);
  }

 }

 private Assembly LoadAssembly(WWW m_WWW)
 {
  try
  {
   return Assembly.Load(m_WWW.bytes);
  }
  catch (System.Exception e)
  {
   Debug.LogError(e.ToString());
   return null;
  }
 }
}

6. load the dll and use reflection to control it as following:


 IEnumerator Start()
 {
  //load script
  yield return StartCoroutine(loadAssemblyScriptAsync("file:///YourAssembly.dll", onAssemblyScriptLoaded));
 }

 private IEnumerator loadAssemblyScriptAsync(string url, Action callback)
 {
  MyWWWAssemblyLoader myLoader = new MyWWWAssemblyLoader();
  yield return StartCoroutine(myLoader.loadAssembly(url, callback));

 }

 private void onAssemblyScriptLoaded(bool success, string url, Assembly assembly)
 {
  if (!success)
  {
   Debug.LogError("onAssemblyScriptLoaded failed");
   return;
  }
  Debug.Log("Assembly url: " + url);

  System.Type type = assembly.GetType("YourClassNameSpace.YourClassName");
  if (type == null)
  {
   Debug.LogError("type is null");
   return;
  }
  FieldInfo field = type.GetField("YourFloatField");

  GameObject go = GameObject.Find("YourEmptyGameObject");
  //add loaded script to go
  Component comp = go.AddComponent(type);

  FieldInfo myFieldInfo = type.GetField("YourFloatField");

  Debug.Log("The field value of YourFloatField is " + myFieldInfo.GetValue(comp));

  myFieldInfo.SetValue(comp, 30.0f);

  Debug.Log("The new field value of YourFloatField is " + myFieldInfo.GetValue(comp));
 }

7. the external script for above code can be:


using System;
using System.Collections.Generic;
using System.Text;
using UnityEngine;
namespace YourClassNameSpace
{
    public class YourClassName : MonoBehaviour
 {
  public float YourFloatField = 1.0f;
  // Use this for initialization
  void Start()
  {

  }

  // Update is called once per frame
  void Update()
  {
   transform.Rotate(Vector3.up, YourFloatField * Time.deltaTime);
  }
 }
}

2017年3月22日 星期三

Unity depth mask using additional camera

reference
sample unity package
Note: this trick doesn't work with Unity SteamVR plugin's CameraRig
Note: this is a different implementation from the depth mask from unity wiki

The basic idea of depth mask is just like normal z-test. You use transparent objects (say mask objects) that are closer to the camera so other objects behind the mask objects will not pass the z-test and not be rendered.

However the problem is that under the same camera rendering, transparent objects can't be considered as passed z-test when opaque objects are behind them.

So the trick is just like the reference link above, use another camera (say camera2) that draws masked object after previous camera(say camera1) rendered the transparent masks.

In this case, camera1 draws first and makes transparent objects write to the z-buffer, then when camera2 is drawing, since the z-buffer is occupied by the transparent objects, the object behind the mask will fail the z-test.

Apparently, the camera1 and camera2 need some settings to achieve the mask effect. Just like the reference link, camera1 needs to render before camera2, so the "depth" property in Unity camera needs to be setup. Just set camera2's depth be larger than camera1's depth to achieve the rendering order.

Then since camera2 draws on top of camera1, camera2's "clear flags" needs to be set as "Don't clear".

Make sure that camera2 has exactly the same camera properties and 3D objects settings as camera1(transforms, fov...), otherwise the rendered scenes will not match.

Add transparent objects into the scene as mask. The transparent objects need to write into the z-buffer, you can use the shader code below to achieve this.

Finally, add a User Layer in Unity (say MaskedObject as the layer name), set masked object to be in the MaskedObject layer, set camera2's culling mask to MaskedObject, then try to move the masked object behind the transparent masks.


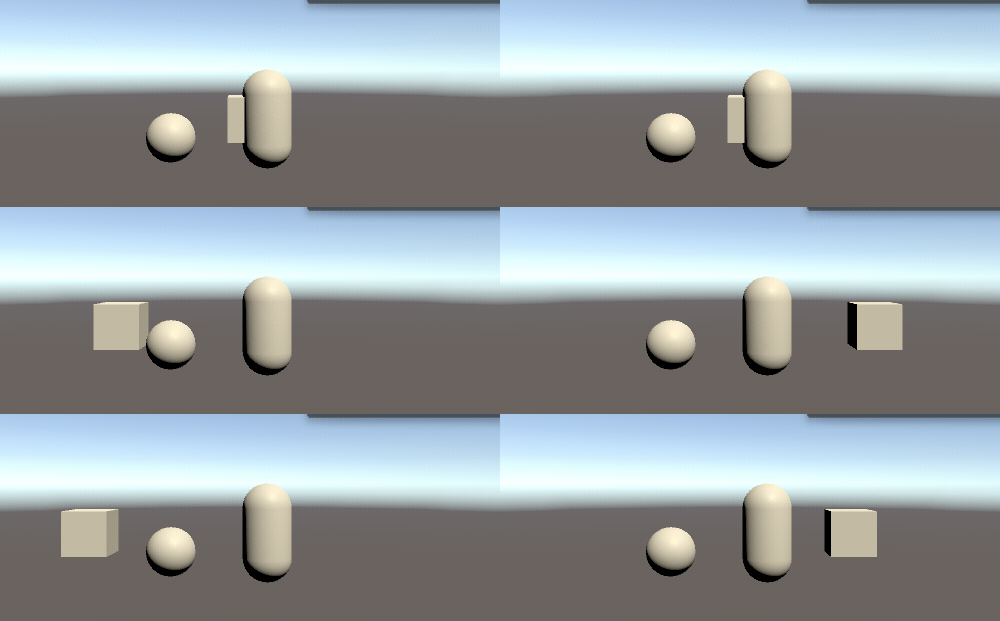
here is the result

the moving cube is masked at certain positions, those positions actually are occupied by transparent cubes and the transparent cubes occlude the masked cube.

the shader code for transparent mask object
Shader "SimpleTransparentZWrite"
{
 SubShader
 {
  Tags{ "Queue" = "Transparent" }
  Pass{
   Blend SrcAlpha OneMinusSrcAlpha
   ZTest LEqual
   Cull Back

   ZWrite On
   CGPROGRAM
   #pragma vertex vert
   #pragma fragment frag
   #include "UnityCG.cginc"
   struct appdata {
    float4 vertex : POSITION;
   };
   struct v2f {
    float4 pos : SV_POSITION;
   };
   v2f vert(appdata v) {
    v2f o;
    o.pos = UnityObjectToClipPos(v.vertex);
    return o;
   }
   half4 frag(v2f i) : SV_Target{
    return half4(0,0,0,0.0);
   }
   ENDCG
  }
 }
}

2017年3月8日 星期三

Windows Node JS app deployed on heroku(using GitHub)

03/14/2017 update: add new heroku deploy notes about modifying the app entry point. if the entry point is not modified, the heroku server always runs the heroku NodeJS sample

1. Download NodeJS here: https://nodejs.org/en/download/ , install NodeJS

2.  Go to GitHub and create a repository: https://github.com/

my repository name is TestNodeJS


3. Go to heroku and create an app: https://dashboard.heroku.com/apps

my heroku app name is myynodejstest

4. Setup heroku's NodeJS sample (follow the steps in the link): https://devcenter.heroku.com/articles/getting-started-with-nodejs#introduction

clone heroku NodeJS sample:
https://devcenter.heroku.com/articles/getting-started-with-nodejs#prepare-the-app

5. git push the heroku NodeJS sample to the GitHub repository created in step 2

6. link GitHub repository to heroku app and deploy to heroku

go to your heroku app dashboard: https://dashboard.heroku.com/apps/your_app_name
press the Deploy button


connect to the GitHub repository of your NodeJS project


deploy the GitHub repository branch


7. check your app by the link: https://your_heroku_app_name.herokuapp.com/

8. Windows NodeJS dev environment setup:
to make npm module globally accessible, you need to add npm module path to user's environment variable:
variable name: NODE_PATH
variable value: %USERPROFILE%\AppData\Roaming\npm\node_modules
for more info, please check here: http://stackoverflow.com/questions/9587665/nodejs-cannot-find-installed-module-on-windows

9. modify app entry point(03/14/2017 added)
not so sure but I changed the following fields
 -"app.json" - repository
 -"package.json" - main, scripts.start
 -"Procfile" - web: node {your_entry_point_file}(your server.js)

10 other things need to be noticed
 - npm package dependencies: need to modify "package.json" - dependencies
 - server's port: please use "port = process.env.PORT || 5000", if heroku can't bind the port